This post contains affiliate links and I will be compensated if you make a purchase after clicking on my links.
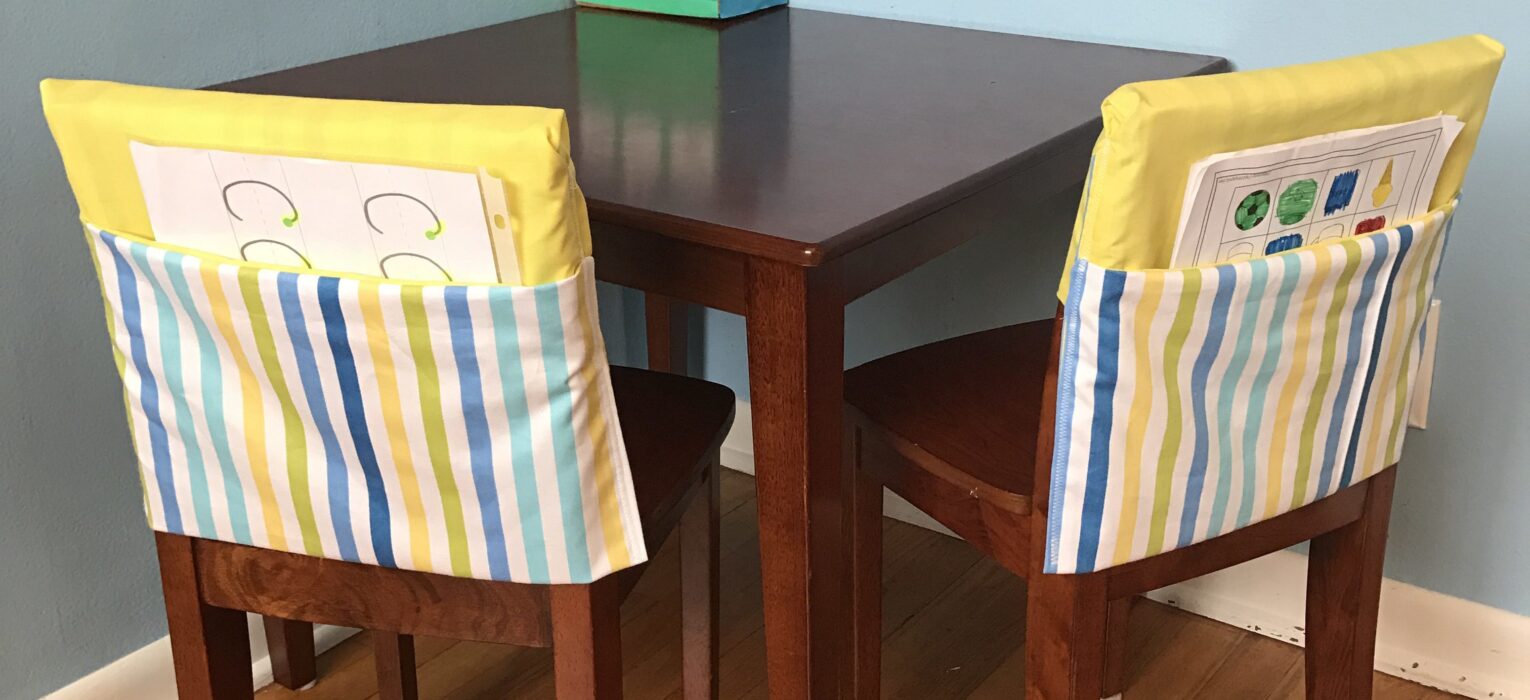
I needed to fix our mess of kids craft table. A homemade chair cover was my solution. Our children’s stages of development can be measured by types of messes that they leave behind. D-Man is in kindergarten and getting homework for the first time as well as learning how to write sentences. Big-C is in early childhood and is working on writing the letters of his name and using a scissors. In our dining room we have a children’s table and chair set. Much of our kids’ crafts, homework, and kids fodder ends up here. This corner of our dining room had become a disaster area in need of a makeover.

Clean up the space
To find a place for the items instead of the table was my first step. I ended up emptying a drawer in our buffet for extra coloring books, sticker activities and play-doh items. The 6-pack of beer I upcycled last year into a simple craft supply organization box is staying on the table because it is used most often. The next would be a place for the boys’ actual homework.
I already have misplaced D-Man’s math homework three times and I really don’t want to keep misplacing his homework. We needed a spot that was only meant for his homework. Big-C gets items to work on at home, although not truly homework. He should have a place to put his practice work also. Both of the boys are going to get a pocket chair cover.
Let’s get sewing!
First we need to assemble our supplies. I used 2 materials one solid color and one with a striped pattern. I bought 1 1/2 yards of each, just in case a mistake was made or if I wanted to make something extra to also match. You will need coordinating thread, sewing machine, pins and cutting supplies.
Next taking measurements and cutting the material (just so you know this is my least favorite part of the craft time). The measurements will vary on your chair and the thickness of the back rail. My material measured 15 inches wide and 28 inches long. Take your tape measure from the mid back of the chair, up over the top rail, down the back and up again to form the pocket. The material will be cut into 2 matching rectangles for each chair. 
Pin the right sides together. Sew around the outside using a straight stitch leaving your opening along the long side. You will close this opening when you sew up the pocket. Trim off the corners to avoid overcrowding when folding it into a pocket and cover. Reverse the material to right sides out and press. I like to press so that it’s easier to arrange into a pocket over the chair.
Pin twice Sew once (hopefully)
Drape the material over the chair and begin to pin. Secure the lower end (blue pin), tuck down the top like you are wrapping a present and pin the top end (red pin). Repeat on the other side of the chair back. 
Form the pocket on the bottom and pin it about midway up the chair back and pin in place. Do the same on the other side. 
Take a look at your pocket straight on make sure you have the pocket straight. Once it’s how you want it, press the pocket bottom. You want to press the bottom so you don’t lose where you decided to place the pocket.  Undo your pins holding your pocket and remain the chair rail pins in place. Sew up each side using a zig zag stitch. I removed part of my sewing machine’s base to be able to get up into the tight space at the top of the chair rail.
it’s okay if mistakes happen
Sew the sides then fold the pocket back up following your pressed line. Re-pin to hold while you sew up the pocket. Be warned at this point your children may return and distract you enough that when you begin sewing you will inadvertently get a part of the material tucked under the needle. Never fear that’s what a seam ripper is for. 
Once redone I made sure I secured the pocket with a few passes of the zig zag stitch. I intended these pockets to hold only a few pieces of paper. Big-C immediately took the pocket chair cover off the chair and used it as a sleeping bag for a “few” of his guys. 
I love how they turned out this make it Monday! My hope is that they continue to enjoy writing, coloring, cutting and crafting as they go through school. I will continue to adapt their area so they can use their creativity and I can keep my need for organization in check.


Jamie
Very cool
Kim Amy
Thanks it was easier than I thought it was going to be.
Angela
Great idea and I love that you have a dedicated table for your kids’ crafts.
Kim Amy
Well they most certainly can’t have MY table, HA. My table is the dining room table so I can’t have it half the time either:)
Emily
I love this! We have SO much clutter, I’m going to have to make these and see if it helps!!
Kim Amy
Let me know how it turns out!
Maria
These are super neat especially for my bookworm son! Thanks for this!
Kim Amy
Great, I hope it works out. Your son will love them
Ashly J
Love this idea! I need something like this in my daughter’s craft/play room.
Kim Amy
OH let me know if you make them and how it turns out.
Lorna Ye
So cute. Love those chair covers!
Kim Amy
Thanks, we love them and they actually match our dinning room!
Kendra
These are so cute and very useful! I love all the organization. Looks like you fit quite a bit! I love the idea of them but sewing is outside my skill set. I might try to stick my mom on making these for the kids! Thanks for the great tutorial!
Kim Amy
Thanks, it is easier than it looks once you get into it. Great gift for grandma to make for your kids
Trica
This is a great idea! I’ve seen these in stores before, but never thought to make my own. I could even match them to my son’s room decor! Thanks for sharing.
Kim Amy
Totally I decided on our colors because are walls in the dining room are blue and our table is yellow Formica (someday I will grow up, but I love color!)
Jessi Joachim
I am not one to sew. I have a sewing machine my husband got me and I haven’t figured out how to even thread it… I have had it like 3 years now. These seem super cute and simple though. I really need to learn to use my machine.
Kim Amy
I was in the same boat a few years ago. I checked out “Sewing for Dummies” from the local library and got out the owner’s manual. Pick up some clearance thread/material and just experiment. It will be easier than you know!
Brittney
We have the exact same table and it’s a mess. The only difference is that it’s because of years of abuse, not stuff on top of it. We have had it since my oldest daughter was 3 (she’s 9 now), so I guess it’s held up ok. These pockets may distract from some of the wear and tear 🙂
Kim Amy
I love that table and chairs, my in-laws bought it for the kids and it goes nicely even in a dining room rather than a play/kids room. Super sturdy!
Liz
Super simple! And such a great idea. I don’t have a kids craft table to use this on but I’m for sure using the six pack upcycle.
Kim Amy
YES I’m surprise how well that has held together. Give it a go!
Julie
They are brilliant, what a fab idea. Pinning.
Kim Amy
Thanks for the pin!
Mary - theboondocksblog
What a cute idea. And more importantly it is super practical and helps keep the area clutter free.
Kim Amy
Yes and so far it’s working!
Victoria @DazzleWhileFrazzled
Great idea! I’m always looking for ways to keep the kids organized. Visiting from Pretty Pintastic Party.
Kim Amy
Thanks for the visit, it’s actually working to stay organized for now.
Sylvia D.
Kim, I think this is a genius idea. Love the colors. Great job! Sylvia D.
Kim Amy
Thanks we have blue walls and a yellow table in our informal dining room.
Leanna
Chair covers really give a new lease to old chairs. They hide scratches, add colour and can add holiday cheer.
This is an excellent simple tutorial. Pinning.
Amber Harrop
What a clever idea these chair pockets are Kim – thank you for sharing
Kim Amy
Thanks, they’ve come in really handy the boys know where they can always find their homework.
Lori
What a brilliant idea! That would’ve been perfect during my homeschooling years… Thank you for sharing at Dishing It & Digging It!
Kim Amy
Thanks I’m not a homeschooler, but tired of sifting through coloring/sticker pages to find homework
Ginger M Cochran
What a great idea 🙂 Thank you for sharing with me for Support your Fellow Crafter 🙂