This post contains affiliate links and I will be compensated if you make a purchase after clicking on my links.
We have the most charming piano. I learned how to play on it when I was young and possibly someday at least one of my children will also learn how to play on the piano. Currently they enjoy using it to bang on the keys. Also to mine and my mother’s dismay they enjoy driving their cars, dancing their figures, and landing their airplanes across the piano bench. We’ve tried to throw a nice colorful mat over it, but it slips right off. Occasionally with a small boy along for the ride!

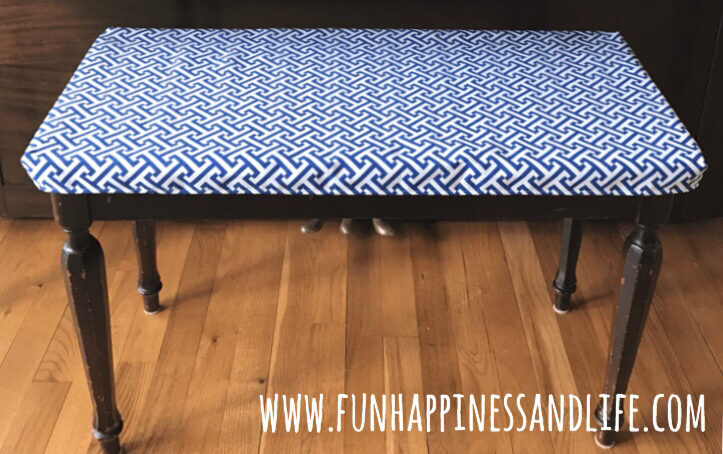
See super charming piano. Love seeing it every morning in our front room. My parents originally purchased the piano from the sister of my great grandmother, and now I am entrusted with it. My boys don’t quite grasp the concept of not marring the piano. Come closer and see what damage my sweet loving boys have done to the bench.
mom avert your eyes from the screen!

Scratches and marks that can only be corrected with sanding and refinishing. I don’t have time for that! And I may not possess the skills to do a good job. What I do have the time for is to make a easy removable piano seat cover. I thought of this when I was making my IKEA magnet board cover this winter.
There were a few reasons I wanted it to be removable. First off I didn’t want to take a staple gun to my family’s piano bench. Secondly, I have boys, I need to be able to wash this material if need be. Third, my tastes change and my accents in the rooms our family inhabits change. I want to be able to make changes easily.
The reason I had time to whip this up today was because my littlest one had surgery recently. He is doing well but laying low. In our house that means movies, shows and Wii video games. I’m a little bit screened out and needed a break. This project took me the length of the Lion King to finish. Now, it really shouldn’t take you that long, I would say about a quarter of the time. This was my boys first time watching the Lion King. Lets say they needed a little comfort when daddy died, the hyenas came out, whenever Scar was on camera…..So I was going from couch to sewing machine throughout this piano project.
Piano Seat Cover Tutorial
Supplies you will need include one yard of fabric, coordinating thread, elastic and basic sewing supplies.
-
- Measure the piano seat allowing for a 1½ inch overhang and ½ inch hem allowance. Our measurements came out 34 inches x 18 inches.
- Iron your ½ hem and use a straight stitch around the entire material.

- Measure your elastic along the length of the seat and pull to add tension.

- Sew elastic ends to the middle of short sides of the material. Using either a zig-zag for greater strength or straight stitch (if you don’t have 2 boys that will try to pull it off the minute to put it on the piano bench).

5. Place material on the bench with elastic wrapped around pull out each corner into a point. 6. Fold the corner over the short end of the bench and pin in place. It is important to pin all corners at the same time. Once they are all pinned step back to make sure it’s even. Make adjustments if needed.
  7. Using a straight stitch sew those corners into place, going over the previous hem lines
8. Place your cover on the piano bench and admire your handy work (now go explain to your oldest where that new lion cub that’s with Simba and Nala came from.) 

I am so happy with how this turned out. Now onto the rest of the room, because it needs to go better with my new piano bench!! Please join us every Monday for a new Make It Monday craft, DIY or homemade project.


Lia
OMG such a great idea, my dad’s piano seat needs an update!
Kim Amy
Glad you like it. Future gift for your dad?
Dsni
What a great idea! There was a piano in my house as were growing up and I remember having a lot fun banging at it and messing it up …. ooops!!! My mom would have loved this idea!
Kim Amy
My mom does love it, just wishes I made it earlier.
jennifer
love this idea! my daughter asked me to teach her to sew! i have no idea how to even sew a button on a shirt haha we will be learning together 🙂 i love the pattern you chose, too!
Kim Amy
Get sewing for dummies book, that’s how I started. There are also great sewing lessons for kids at Jo Ann Fabrics and Michaels.
Amanda M Rodriguez
OOOH I love this!! Wish I were this crafty haha
Kim Amy
You could totally make this!
Maria
Ooh so neat! My hubby likes sewing i for the life of me cannot do a simple Stitch..but this is super easy! Thanks for sharing!
Kim Amy
Great, it’s nice if anyone in the family is able to sew. Such a helpful skill.
Morgan Schoenrock
I love this idea! We don’t have a piano but I could alter this to fit my coffee table where my sons insists on standing and eating off. It would be so easy to throw this in the wash instead of continually washing the table. Thanks for sharing!
Kim Amy
Yes, think about using outdoor fabric or scotch guard you fabric if you are going to use it where it will get stained.
Tracy Welham
Wow, that looks lovely, so neat too! Creative Blessings, Tracy x
Kim Amy
Thanks for your visit
Meghna
Wow!! My mom would love it. Thanks
Kim Amy
My mom did too!
Tricia
Great idea! It looks awesome and really updates the room!
Amanda
I don’t have a piano but I want one so this will be so handy later!
Kim Amy
Great, pin it for later!
Alexandria Salahshour
How awesome! Great idea! One day I’ll have to do this to one of my chairs if they get old and raggy!
Kim Amy
I know it was so quick maybe I could make seasonal covers for the bench also and chairs!
ohmummymia
looks lovely! it’s so many things that we can do by ourselves and they’re look better than bought from shop
#bestandworst
Kim Amy
Exactly, I would have never found anything that would fit this well!
Sarah Howe
You are very clever! What a neat project and impressed it didn’t take too long either! Thanks for sharing with #bestandworst x
Kim Amy
Thanks, it went quicker than I thought it was going to!
Christine
Loving this project, especially the fabric. That color is just perfect! Thanks for sharing his at the DI & DI Link Party.
Kim Amy
Thanks, I have so much material left over I’m thinking of making shelf liners with it. Stop by next week!
Ginger M Cochran
Love this 🙂 I’d be honored for you to visit my blog and linp up on Support Your Fellow Crafter linky Party 🙂 Thanks!
http://SUPERSTINKYBOYS.BLOGSPOT.COM/2017/03/SUPPORT-YOUR-FELLOW-CRAFTER-LINKY-PARTY_20.HTML
Kim Amy
Thanks, totally just linked up. The rules didn’t state how many posts so I added 3 thanks for the heads up. I love link parties!
Heidi
Love this cover and that it’s removable! So cute! Thanks for sharing at Funtastic Friday!
Kim Amy
Thanks, I love your link party!
Jann Olson
Super cute! I love the fabric you used. Thanks for sharing with SYC.
hugs,
Jann
Leanna
Thank you for the great tutorial. The piano bench turned out perfectly. I don’t own a piano bench but am pinning this to my sewing board. Great tutorial on how to sew on elastic, simple and straight forward. Love it, thanks for the lesson.
Grandmas House DIY
Looks amazing! Thanks for sharing with us at the To Grandma’s house we go Wednesday link party! You will be featured tomorrow morning when the next party starts!
Vanessa
This is a great idea and I love how it can be easily changed out. Thank you for sharing at Dishing it and Digging it link party.